Google Click ID (GCLID): The Attribution Tracking Your Competitors Aren’t Using
Most marketers are flying blind when it comes to attribution. They see a lead come through their website but have no idea which Google Ad actually drove that person to convert. Enter GCLID – Google’s underutilized tracking superpower that connects every click to every conversion with precision.
While third-party cookies crumble and iOS updates wreak havoc on attribution, GCLID remains highly effective. It’s privacy-compliant, works across all devices, and gives you attribution accuracy that far surpasses platform reporting quality.
The best part? Most of your competitors aren’t using it.
This guide will show you exactly how to implement GCLID tracking to finally answer the question: Which ads are actually driving my new customers?
TL;DR
- The Problem: GA4 misses 20-30% of Google Ads conversions due to ad blockers and privacy settings
- The Solution: GCLID tracking survives ad blockers, iOS updates, and cookieless browsing
- The Setup: 4 steps, ~45 minutes total (GTM tags + CRM field + Zapier integration)
- The Payoff: See which ads actually drive new customers
- Best For: Anyone spending $5K+/month on Google Ads who wants accurate attribution
How GCLID Works: Improved Attribution & Accuracy
GCLID acts as a digital fingerprint for every Google ad click. When someone clicks your ad, Google automatically creates a unique identifier and adds it to your landing page URL. This ID connects that specific person to that specific ad—even if they don’t convert until weeks later.
Here’s what happens:
Step 1: The Click User searches → clicks your Google ad → GCLID automatically gets added to your URL (you’ll capture and store this)
Step 2: The Journey User browses your site, leaves, comes back via email, social media, or organic visit → GCLID stays connected to them
Step 3: The Conversion User finally converts → GCLID is collected as user data and can trace that sale back to the original Google ad click
Why This Matters
With iOS blocking tracking and third-party cookies disappearing, most attribution methods are becoming unreliable. But GCLID? It’s built into Google’s ecosystem and doesn’t rely on cookies that users can block.
Bottom Line: Instead of optimizing for the last-click, you’ll optimize for the ads that actually drive new visitors.
4-Step GCLID Setup in Less Than an Hour
Google provides a detailed step-by-step process that slightly overcomplicates things, but offers a good visual for the necessary steps.
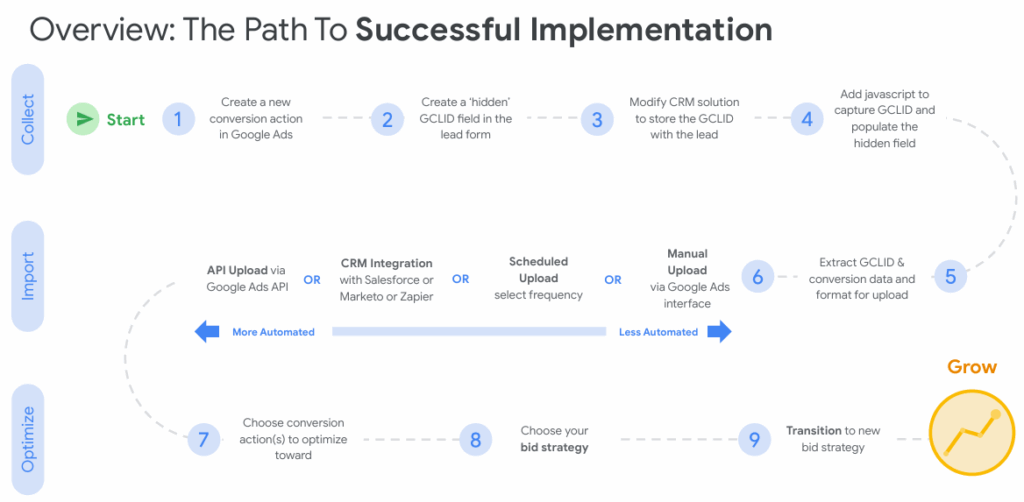
Simplified, this process includes four main steps:
- Capture GCLID on Every Page
- Prepare Your CRM
- Connect Forms to Capture GCLID
- Automate Data Import to Google Ads
Step 1: Never Lose Track of Ad Clicks Again (10 minutes)
When users navigate through your website, the GCLID in the URL disappears. You need to “remember” it throughout their entire session.
To do so, store the GCLID in your browser’s localStorage. This will keep a record even if the user navigates through your site or ends the session.
What You’ll Do:
- Create a Google Tag Manager variable to grab GCLID from URLs
- Set up a tag that saves this GCLID in localStorage
- Add another tag that puts the GCLID back in URLs when needed
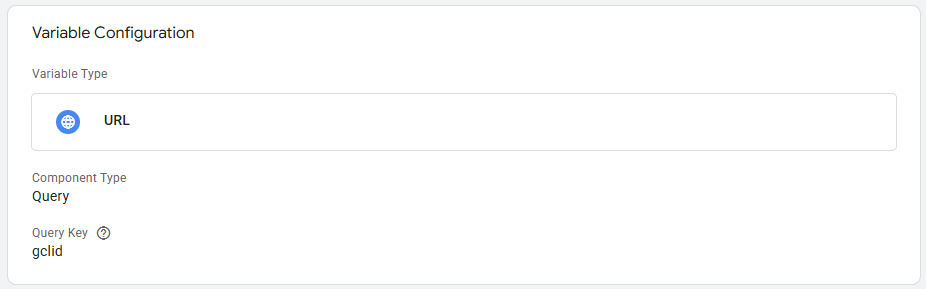
First create a variable that identifies the GCLID in the URL string:
Custom Variable: URL – GCLID
- Variable Type: URL
- Component Type: Query
- Query Key: gclid
Then, create a tag that uses this variable to store the value in localStorage:
Custom HTML – Store GCLID in localStorage
Trigger: All Pages
See Detailed Code
<script>
(function() {
  try {
    // Get GCLID from URL parameters
    var urlParams = new URLSearchParams(window.location.search);
    var gclid = urlParams.get('gclid');

    // Only store if GCLID exists and isn't empty
    if (gclid && gclid.trim() !== '') {
      localStorage.setItem('gclid', gclid);
      console.log('✅ GCLID stored successfully:', gclid);

      // Optional: Set expiration (90 days to match Google's retention)
      var expirationDate = new Date();
      expirationDate.setDate(expirationDate.getDate() + 90);
      localStorage.setItem('gclid_expiry', expirationDate.getTime());
    }

    // Clean up expired GCLID
    var expiryTime = localStorage.getItem('gclid_expiry');
    if (expiryTime && new Date().getTime() > parseInt(expiryTime)) {
      localStorage.removeItem('gclid');
      localStorage.removeItem('gclid_expiry');
      console.log('🧹 Expired GCLID cleaned up');
    }

  } catch (error) {
    console.error('❌ Error handling GCLID:', error);
  }
})();
</script>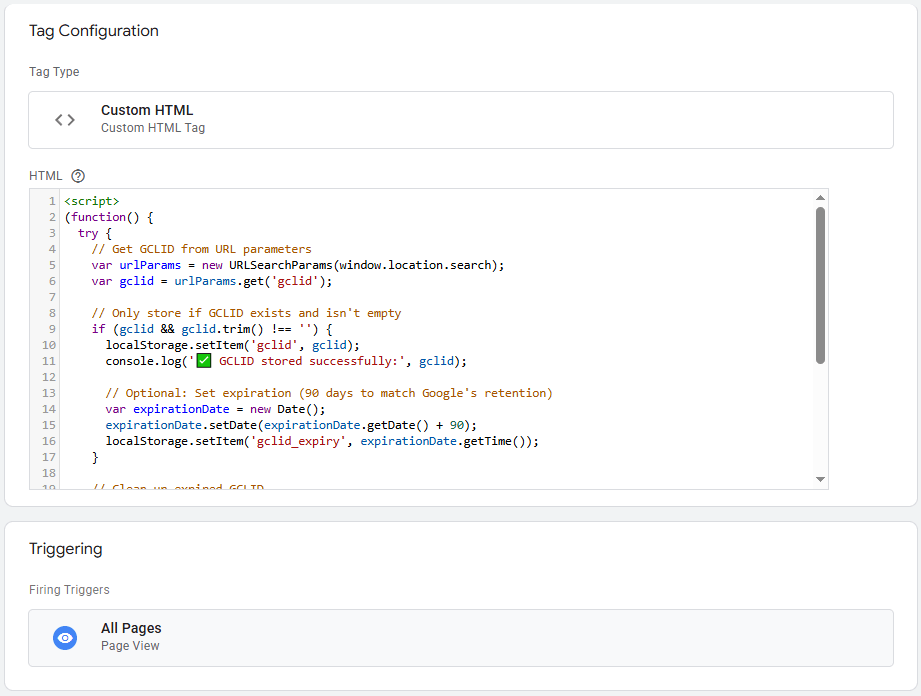
This creates a first-party cookie keeps the GCLID persistent in the user’s browser. At any point during their browsing session (or even in a new session), this cookie can be accessed.
After setup, click a Google ad and check if gclid appears in your browser’s localStorage (Developer Tools > Application > Local Storage)
Step 2: Set Up Your CRM to Capture Click Data (10 minutes)
This step sets up a place to store GCLID data with each lead. Two different approaches can be taken.
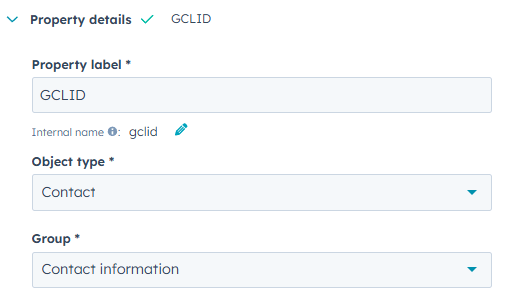
Option 1: Custom Field (Recommended)
- Create a new field called “GCLID” in your CRM
- Set it as a hidden field that auto-populates
- Works with: HubSpot, Salesforce, Pipedrive, most modern CRMs
This setup allows GCLID to populate into the form and creates a custom variable to capture it in the CRM.
Option 2: Existing UTM Field (Backup)
- Use an existing UTM parameter (usually utm_content)
- Perfect for platforms without custom fields
- Works with: Workable, Typeform, basic form builders
This method is actually easier than a custom field as no additional fields need to be created, but it lacks flexibility. If you’re unsure which option to use, start with Option 1. It’s cleaner and easier to analyze later.
Step 3: Connect Every Lead Back to Its Original Ad (10 minutes)
Capturing GCLID can be done using custom fields or existing fields as explained above. Both approaches use slightly different tags, but achieve the same goal: capturing GCLID in a form submission.
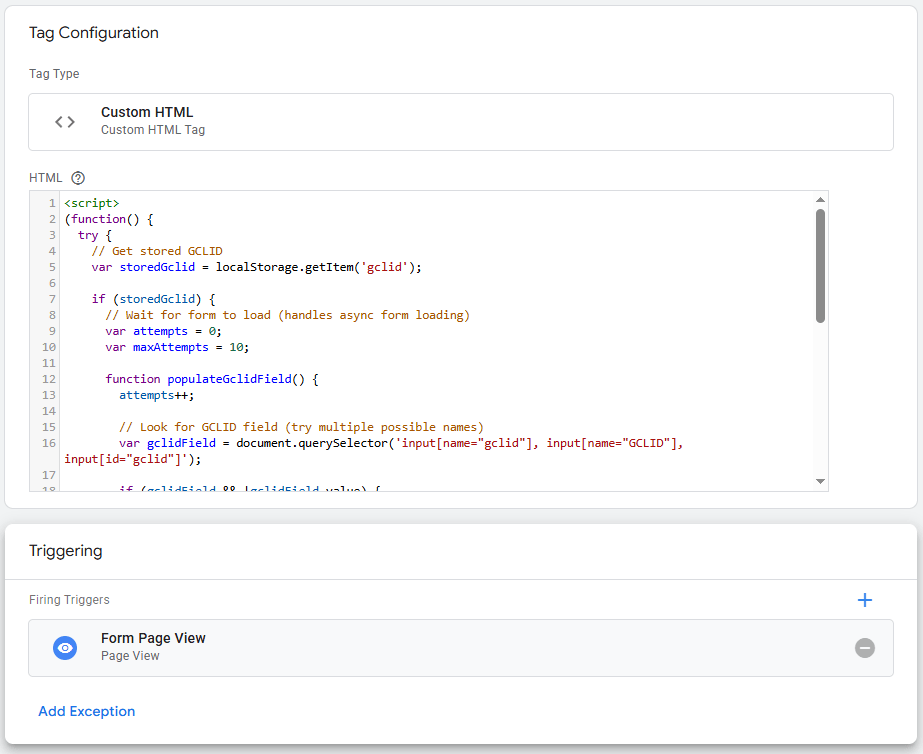
Capturing GCLID in a Custom Field
Add a hidden field to your forms that automatically pulls the GCLID from localStorage and saves it with the contact record.
This allows for the capture and storage of the click ID with each contact submission. To populate the GCLID value into the hidden field, a tag needs to insert it from the URL string:
Custom HTML – Insert GCLID into Custom Field
Trigger: Form Page View
See Detailed Code
<script>
(function() {
try {
// Get stored GCLID
var storedGclid = localStorage.getItem(‘gclid’);
if (storedGclid) {
// Wait for form to load (handles async form loading)
var attempts = 0;
var maxAttempts = 10;
function populateGclidField() {
attempts++;
// Look for GCLID field (try multiple possible names)
var gclidField = document.querySelector(‘input[name=”gclid”], input[name=”GCLID”], input[id=”gclid”]’);
if (gclidField && !gclidField.value) {
gclidField.value = storedGclid;
console.log(‘✅ GCLID populated in form:’, storedGclid);
return true;
}
// Retry if field not found and haven’t exceeded max attempts
if (attempts < maxAttempts) {
setTimeout(populateGclidField, 500);
} else {
console.warn(‘⚠️ GCLID field not found after’, maxAttempts, ‘attempts’);
}
return false;
}
// Start trying to populate the field
populateGclidField();
}
} catch (error) {
console.error(‘❌ Error populating GCLID field:’, error);
}
})();
</script>
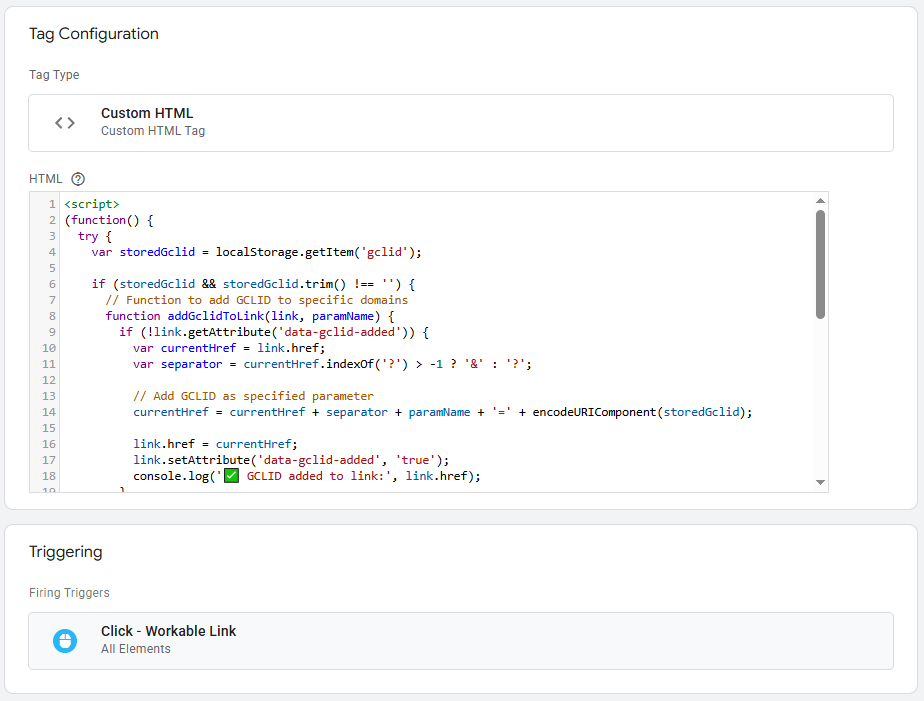
Capturing GCLID in an Existing Field
In the case of existing fields, GCLID must first be inserted into a standard UTM parameter, utm_content in this instance.
Using a custom tag, modify outbound links to include GCLID as a UTM parameter, so external forms capture it automatically.
Custom HTML – Insert GCLID in UTM Content
Trigger: Click – All Elements
See Detailed Code
<script>
(function() {
try {
var storedGclid = localStorage.getItem(‘gclid’);
if (storedGclid && storedGclid.trim() !== ”) {
// Function to add GCLID to specific domains
function addGclidToLink(link, paramName) {
if (!link.getAttribute(‘data-gclid-added’)) {
var currentHref = link.href;
var separator = currentHref.indexOf(‘?’) > -1 ? ‘&’ : ‘?’;
// Add GCLID as specified parameter
currentHref = currentHref + separator + paramName + ‘=’ + encodeURIComponent(storedGclid);
link.href = currentHref;
link.setAttribute(‘data-gclid-added’, ‘true’);
console.log(‘✅ GCLID added to link:’, link.href);
}
}
// Define which domains to track and what parameter to use
var trackingConfig = [
{ domains: [‘workable.com’, ‘.workable.com’], param: ‘utm_content’ },
{ domains: [‘typeform.com’, ‘.typeform.com’], param: ‘utm_content’ },
{ domains: [‘calendly.com’, ‘.calendly.com’], param: ‘utm_content’ }
// Add more as needed
];
// Process each configuration
trackingConfig.forEach(function(config) {
config.domains.forEach(function(domain) {
var links = document.querySelectorAll(‘a[href*=”‘ + domain + ‘”]’);
for (var i = 0; i < links.length; i++) {
addGclidToLink(links[i], config.param);
}
});
});
}
} catch (error) {
console.error(‘❌ Error adding GCLID to outbound links:’, error);
}
})();
</script>
Test It: Submit a test form after clicking a Google ad. Check if the GCLID appears in your CRM record.
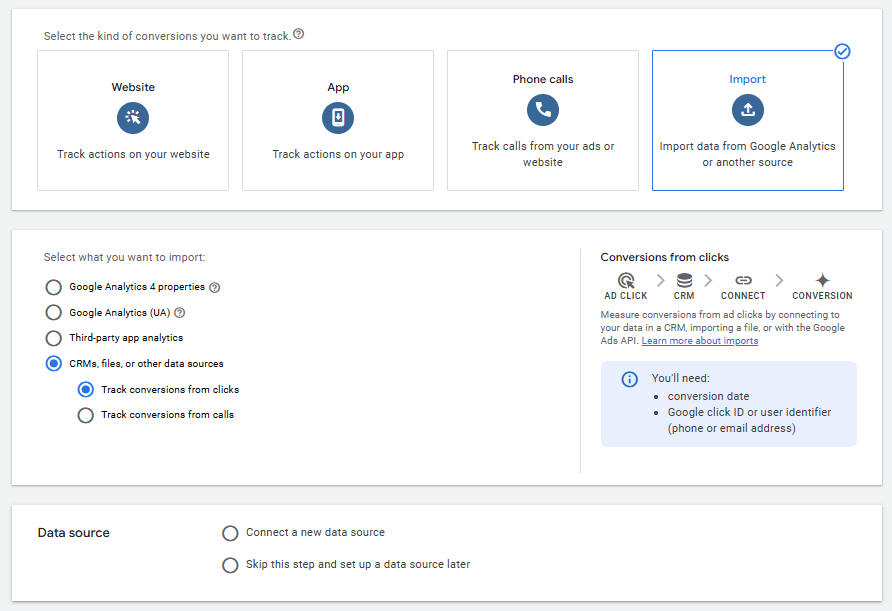
Step 4: Feed Data Back to Google for Better Optimization (15 minutes)
Once these GCLID capture tags are in place, the last step is importing leads to Google Ads. There are several methods with varying levels of automation.
Four Options:
- Zapier Integration: Perfect for most CRMs, free up to 100 conversions/month. Zapier integrates with over 8,000+ platforms.
- Marketing Integration: For high-volume advertisers with technical resources. A full list of partners supported through direct API is provided by Google.
- Google Ads API: Connect your database to Google Ads API to pass through a customized payload directly.
- Manual Upload: Last resort, but works for low volume or testing
Zapier Setup (Recommended):
- Connect your CRM to Zapier
- Set up a “New Lead” trigger
- Connect to Google Ads “Send Offline Conversion” action
- Map GCLID field to conversion import
To set this up, create a new conversion in Google Ads and choose ‘import’. Choose ‘Zapier’ from the list of integrations.
Data to send through your Zapier integration:
- GCLID (required)
- Conversion Timestamp (required)
- Email Address (recommended)
- Phone Number (recommended)
Test it: Create a test lead and verify it appears as a ‘run’ in Zapier and Google Ads conversion reporting within 24 hours.
Pro Tip: To maximize attribution accuracy, ensure your email and phone data is properly hashed for privacy compliance. See our Customer Data Hashing with Google Tag Manager guide to automatically encrypt this data before sending it to ad platforms.
4 Ways GCLID Improves Ad Campaign Performance
While technical in set up, offline conversion importing is superior to traditional browser tracking for several reasons.
1. Beat Ad Blockers and Privacy Settings
Up to 20% of web visitors block tracking scripts, meaning conversion data captured by Google Ads is incomplete. GCLID isn’t blocked by ad blockers or cookieless environments so it contains more complete data.
Offline imports are based on actual conversions and when paired with GCLID data contain a precise list of actual conversions from Google Ads.
2. Better Attribution to the First Click
Setting up GCLID tracking as explained above captures the first GCLID in a user’s journey. This means it’s more representative of the first ad click that drove them to the site.
With brand campaigns and performance max taking credit most of the time, this helps optimize campaigns for new user growth versus returning visitors.
3. Track Qualified Leads Only (Stop Optimizing for Junk)
When Google’s algorithm can’t distinguish between qualified and unqualified leads, it hurts ad campaign performance. Offline conversion imports give advertisers control over what leads are measured as conversions.
Additional logic can be added into the import process to only send leads that have responded to a sales rep, or even those that have turned into deals or sales. Just keep in mind, GCLID is only stored for up to 90 days.
4. Connect Online Ads to Offline Sales
Offline sales are not easy to connect to online engagement. However, all good marketers know online action influences offline behavior.
By capturing some user data online with GCLID, it’s possible to connect offline purchases with online engagement. The only additional step needed is user data (email or phone number) that connects the offline and online engagements.
For manufacturers or retailers with long purchase cycles, this is a necessary way to track the crossover between both environments.
Conclusion: Why Import Offline Conversions
We’re living through the death of easy attribution. iOS updates, cookie deprecation, and privacy regulations have turned campaign optimization into educated guesswork for most marketers.
But here’s what separating winners from losers: data quality.
While your competitors struggle with incomplete attribution and optimize campaigns based on fragments of the customer journey, GCLID tracking gives you the complete picture. You’ll know which ads drive your highest-value customers, which campaigns deserve more budget, and which creative messages actually move the needle.
The setup takes a few hours. The competitive advantage lasts for years.
In a world where every click costs more and every conversion matters more, make sure you’re using your data to its best ability.