
How to Implement Meta’s Conversions API with GA4 and Server-Side GTM
Meta’s Conversions API was introduced in 2020 as a workaround for the impending death of 3rd party cookies. Aimed at giving Advertisers a workaround to browser tracking, it quickly gained popularity as a best practice implementation.
Five years later, and many privacy updates later, Conversions API has become more and more necessary. Yet, it seems like most advertisers are either unwilling or unable to implement it – seen as confusing, expensive, or simply not worth the effort.
The real truth: Conversions API can be implemented for free, even using existing Google Analytics tags.
Let’s break down the two methods, and which one is better to implement.
👉 Skip straight to implementation
TL;DR
The Problem: Meta’s Conversions API seems complex and expensive, leaving most advertisers with incomplete tracking as browser-based pixels become less reliable.
The Solution: Use your existing GA4 tags and server-side Google Tag Manager to create a free, robust CAPI implementation that bypasses ad blockers and improves attribution.
Key Benefits: First-party routing avoids most ad blockers and provides higher quality signals for optimization.
Bottom Line: This method provides 80% of true server-to-server benefits at zero additional cost, making CAPI accessible for businesses of any size.
Two Ways to Run Meta CAPI
Server-side tracking is a method of tracking that sends events directly from a website’s server to a designated platform.
This either allows it to bypass the browser entirely, or use Google Analytics tags which are set on your domain (first-party) and therefore less easily blocked.
True Server-to-Server (S2S)
True server-side tracking involves events set up in your backend (or server environment) that send directly to Meta’s Graph.
Benefits
Since there is no dependency on the browser, this is fully immune to ad blockers, and works even when JavaScript fails to execute.
It also reduces page load speed since it doesn’t rely on resource-heavy 3rd party tags, thereby improving site performance.
Finally, a server-to-server setup allows for more control over when and how events are sent. Batching and retries allow for customization beyond a sGTM setup.
There are however some drawbacks.
Drawbacks
The primary drawback to a full server-side integration is the technical setup. Instead of using existing structures, new events have to be set up in your website’s backend to capture.
True server side integrations also have to take into account a lot of factors that browser tags do automatically.
All in all, this leads to a complex setup that requires a lot of custom coding.
The GA4 to sGTM method is far more streamlined, enabling much simpler and quicker setup.
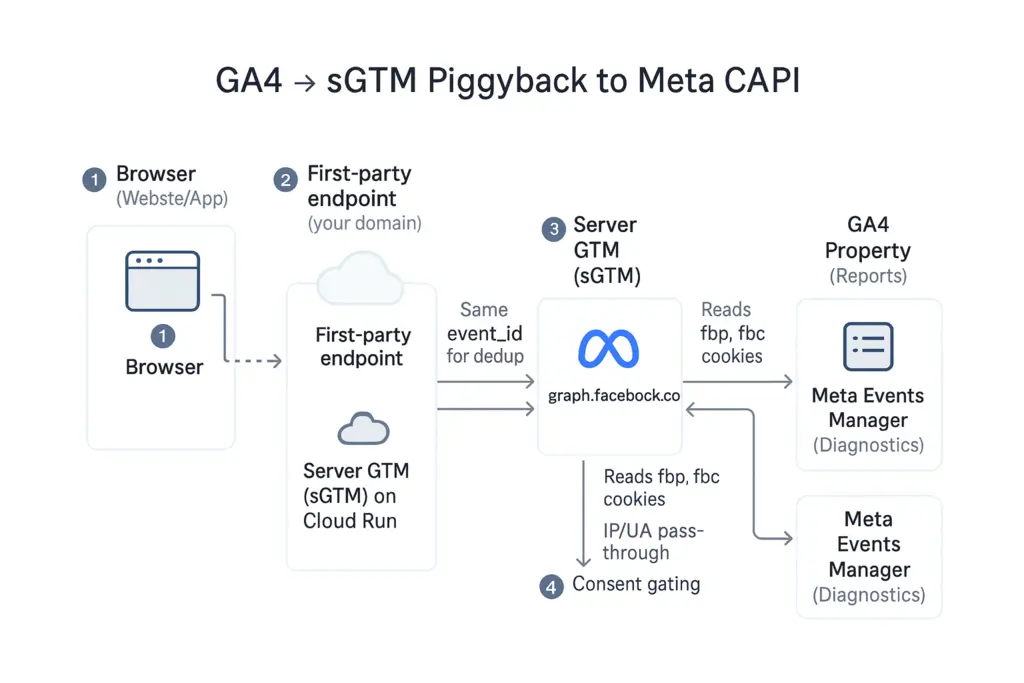
GA4 → sGTM Piggyback
Unlike a true server-side setup, this setup relies on the browser to send events to a first-party server-side GTM endpoint.
Learn how to set up a sGTM container in my guide on true server-side GA4 tracking.
Benefits
The primary benefit of this method is ease of setup using existing web Google Analytics tags.
Since GA cookies are first-party, you get most of the benefit of avoiding ad blockers without the hassle of setting up new events.
This makes it more resilient than traditional browser tracking while retaining the benefits of being routed through a tag manager container.
Drawbacks
Executing in the browser, there is still the potential for blocking if the browser doesn’t run GA4’s JavaScript.
There is also privacy concerns with data sharing between Google Analytics and Meta. Meta’s conversions benefit greatly from customer data like emails and phone numbers, but it’s necessary to make sure these do not get ingested by Google Analytics.
The setup looks similar to a true server-side setup, though reusing browser tags removes one step entirely.
This raises the question – which one is better for me? Let’s look at a side by side comparison.
Side-by-Side Comparison
Both methods have their distinct benefits and drawbacks making the right solution depend entirely on needs and available resources.
| Dimension | True Server-Server | GA4 → sGTM Piggyback |
| Depends on JavaScript | No | Yes (to fire GA tag) |
| Resistance to Ad Blockers | Highest | High |
| Setup Time | 25+ hours | 10 hours |
| Data Quality | Full Control | Very Good – especially when GA4 events are well modeled |
| Engineering Lift | High – custom HTML + server setup | Lower – uses no-code GTM tags |
| Cost | Small Cost – Server (depending on event volume) | Small Cost – Server (depending on event volume) |
| Ideal Use Case | Enterprise or data-mature orgs ($100k+/month or more) | Small to Mid-scale ($25K/month or more) |
For most businesses, starting with the GA4 → sGTM piggyback is a good entry into Conversions API tracking. From there it can evolve to a full server-side setup.
Let’s implement the GA4 → sGTM method step by step.
GA4 to sGTM CAPI Integration
Before beginning, there are a few dependencies for setup. Make sure you have the following:
- Google Tag Manager Web container with Google Analytics event tracking
- sGTM container connected to Google Cloud Run (see my full sGTM setup guide)
- Existing Meta Ads events setup in your GTM web container (to dedupe/measure accuracy)
Once you have access to the above, you can begin the setup process.
Step 1: Point GA4 to Your Server (set transport_url)
To set this up, add an additional parameter to Web GA4 configuration tag only. This routes all GA4 event tag fires through the sGTM container which stores them as first-party data.
- transport_url = https://sgtm.yourdomain.com/g/collect
It also ensures that event specific parameters are passed through to your sGTM container. Let’s review what parameters are needed by Meta’s Graph.
Step 2: Add Event Parameters in Web (event_id, items, x_meta_*)
To ensure you’re sending the correct data to Meta, confirm that the follow parameters are included in web GA4 event tags.
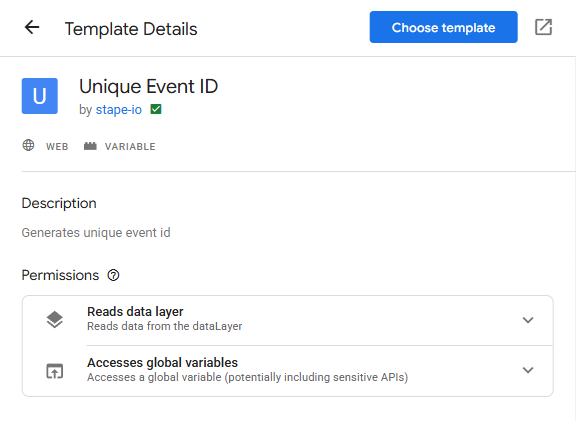
Event ID
Event ID is absolutely crucial for deduplicating events between web and server container. All GA4 event tags must have this parameter included.
To build, search for a variable in the Community Template Gallery with the name ‘Event ID’. Stape has a great custom template that I use.
Additional data is needed for ecommerce events to pass through parameters like product ID, item quantity, and price.
ECommerce Event Parameters
Meta’s conversion tags rely on information like product ID, quantity, and price to optimize and attribute revenue.
Make sure any GA4 ecommerce events include the following:
- items (product ID, quantity, price)
- value
- currency
- transaction ID
These will be transformed into Meta’s standard event naming in the server GTM container.
Customer Data Parameters
The last piece of data to send is customer data like email addresses, phone numbers, name, etc. These need to be hashed prior to sending for privacy compliance purposes.
Review how to set up hashed customer data fields in my GTM customer data hashing guide.
One caveat to this is that GA4 is not built to ingest customer data. Make sure to create variables for email, phone number, name, etc that use the following naming convention:
- x_meta_*
That way, the parameters can be removed in server container before sending to GA4. Refer top Meta’s standard parameters for customer data naming convention.
Once this data is flowing through the GA4 event tags, the server container can be configured.
Step 3: Configure sGTM (GA4 client, event mapping, FBP/FBC, IP/UA)
The GTM server container will act as the middleman between Meta’s Graph and web GA4 tags. It’s strength comes from it’s ability to customize and transform data into the right format.
First, ensure the container is connected to the web tags.
GA4 Client
In the clients tab of you sGTM container, ensure GA4 is set to priority 0. This will ensure it’s used as the default.
This ensures that the transport URL you set with /g/collect is read properly.
Next, find the access token in Meta that will connect your GA4 web tags to Meta’s Graph.
Access Token
Meta’s API access token can be found in Events Manager > Datasets > Settings. Make sure you use the token that tracks online events, not direct API integration.
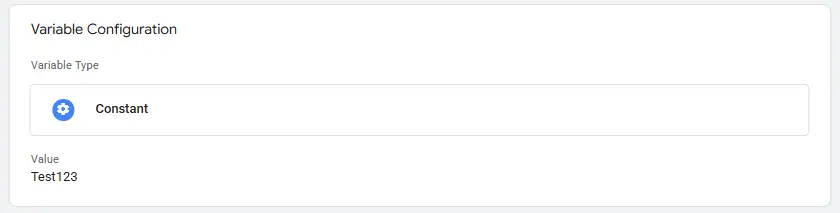
Create a ‘Constant’ variable in GTM to store this.
Variable Type: Constant
Next, create a table that transforms GA4’s event names into Meta’s standard events.
Event Mapping
To ensure you’re sending data with Meta’s standard event names, create a lookup table that maps GA4 event names to Meta’s.
Lookup tables are a variable that translates data from one format into another value.
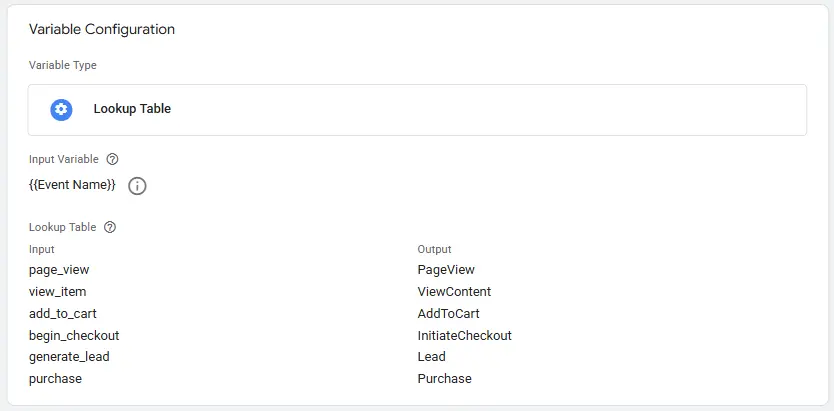
For the purpose of standard event mapping, use the following values/formats:
- page_view → PageView
- view_item → ViewContent
- add_to_cart → AddToCart
- begin_checkout → InitiateCheckout
- generate_lead → Lead
- purchase → Purchase
Capturing FBC/FBP
Important for matching back to user profiles, FBC/FBP need to be included in your conversion tags.
The server container can read cookies on your site. We’ve reviewed how to add FBC to a first-party cookie in my offline conversion import guide.
For a simple CJS that captures both FBC and FBP in first-party cookies, implement the following Custom HTML in your web GTM container
- Tag Type: Custom HTML
- Trigger: All Pages
Detailed Script
<script>
(function(){
  // helper: apex domain (replace if you know it exactly, e.g. ".fiveninestrategy.com")
  var host = location.hostname, parts = host.split('.');
  var apex = (parts.length > 2) ? '.'+parts.slice(-2).join('.') : '.'+host;

  // _fbp: fb.<subdomainIndex>.<creationTimeMs>.<randomNumber>
  if (!document.cookie.match(/(?:^|;\s*)_fbp=/)) {
    var ts = Date.now();
    var rnd = Math.floor(Math.random()*1e10);
    var fbp = 'fb.1.' + ts + '.' + rnd;
    document.cookie = '_fbp='+fbp+'; path=/; samesite=Lax; max-age='+(90*24*3600)+'; domain='+apex;
  }

  // _fbc only when fbclid is present
  var m = location.search.match(/[?&]fbclid=([^&]+)/);
  if (m) {
    var fbc = 'fb.1.' + Date.now() + '.' + m[1];
    document.cookie = '_fbc='+fbc+'; path=/; samesite=Lax; max-age='+(90*24*3600)+'; domain='+apex;
  }
})();
</script>
Once these are captured, create cookie value variables to capture them in your server GTM container.
- Variable Name: Cookie – _fbp
- Variable Type: Cookie Value
- Cookie Name: _fbp
- Variable Name: Cookie – _fbc
- Variable Type: Custom Javascript
- Cookie Name: _fbc
Finally, mapping product info to Meta’s standard formatting is needed.
Mapping GA4 Items to Meta’s Contents
As alluded to previously, GA4 uses the standard name ‘items’ for product id, quantity and price. Meta’s standard event is called ‘contents’
To map from GA4 to Meta, use a custom variable template to create a JavaScript function that translates [items] to Meta’s contents format.
- Variable Type: Custom Variable Template
- Permissions: Reads Any Event Data
Detailed Script
var getAllEventData = require('getAllEventData');

function isArray(a) {
  return a && typeof a.length === 'number' && typeof a.splice === 'function';
}

function pick(first, second, third, fallback) {
  // returns the first non-empty value
  if (first !== undefined && first !== null && first !== '') return first;
  if (second !== undefined && second !== null && second !== '') return second;
  if (third !== undefined && third !== null && third !== '') return third;
  return fallback;
}

var ed = getAllEventData();
var items = (ed && (ed.items || (ed.ecommerce && ed.ecommerce.items))) || [];
if (!isArray(items)) items = [];

var contents = [];
for (var i = 0; i < items.length; i++) {
  var it = items[i] || {};
  var idRaw = (it.item_id !== undefined ? it.item_id :
              (it.id !== undefined ? it.id : ''));
  var id = '' + idRaw; // stringify
  var qty = pick(it.quantity, null, null, 1);
  var price = pick(it.price, it.item_price, it.value, 0);
  contents.push({ id: id, quantity: qty, item_price: price });
}

return contents;
Other event data like transaction ID, value, currency, etc. can be pulled directly from the GA4 event tags using event data variables.
Creating Event Data Variables
In your sGTM container, find the custom variable named ‘event data’. This will map variables to include in your CAPI tag from parameters in your GA4 event tags.
Event data variables can be created for the following using the GA4 naming convention for each:
- content_type
- currency
- value
- order_id (transaction_id)
- x_meta_*
The final step is creating User Data variables needed for better attribution.
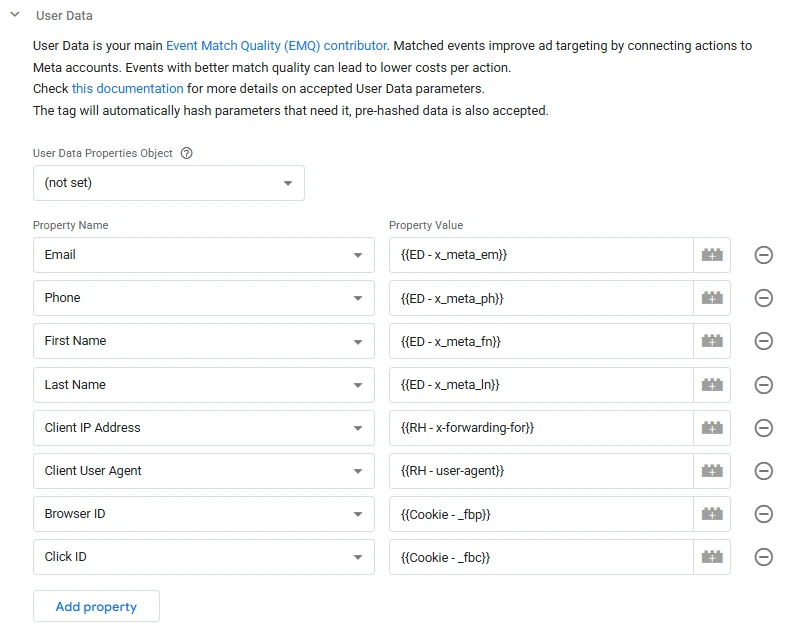
Creating User Data Variables
Two variables that are custom builds within sGTM are IP address and User Agent. They’re core signals Meta uses to match events to actual users.
These variables make use of the Request Header variable, making them simple to set up.
IP Address
- Variable Type: Request Header
- Header Name: x-forwarded-for
User Agent
- Header Name: user-agent
- Variable Type: Request Header
When using a CDN or other server to pass requests through, additional IP variables are helpful to include.
- cf-connecting-ip (for Cloudflare users)
- true-client-ip (for other CDNs)
Note: Those variables require a custom variable template that chooses the best user IP address.
With these variables created, it’s time to set up your Meta CAPI tag.
Step 4: Build the Meta CAPI Tag (user_data + custom_data)
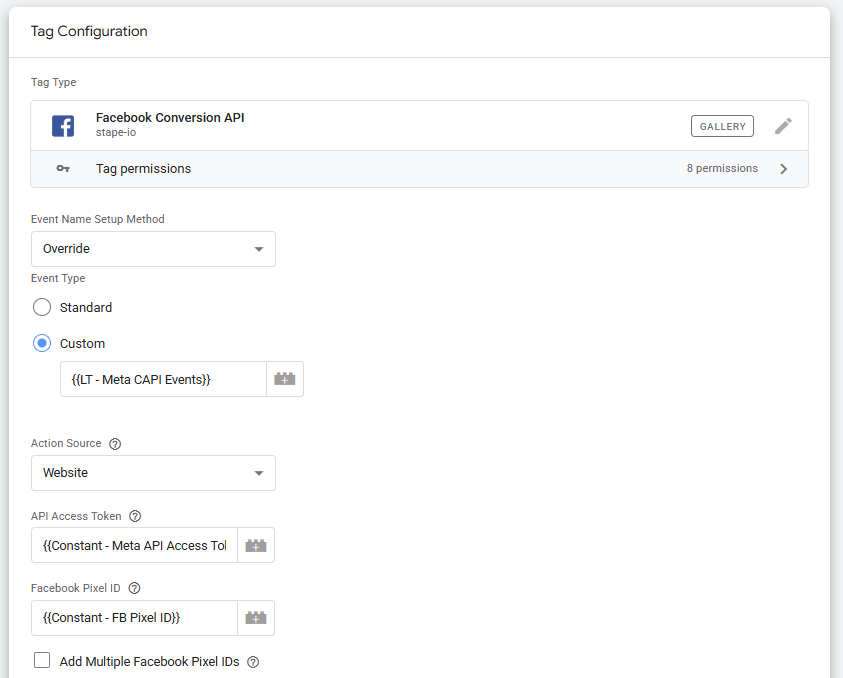
The Meta CAPI tag uses a template from the Community Template Gallery – simply search ‘Facebook Conversions API’. I like the Stape-io tag template.
Create The CAPI Tag
You’ll need to create a tag and assign the following up front:
- Pixel ID – Constant
- Access Token – Constant
- Event Name – Lookup Table
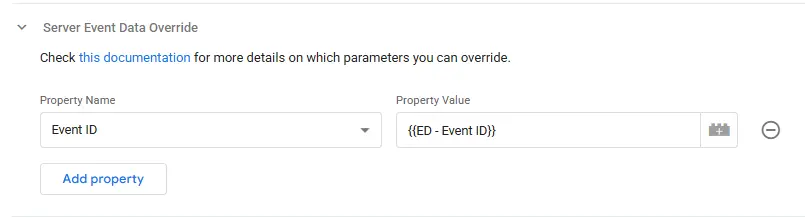
After the access token, pixel ID, and event mapping are added, update the Event ID.
Add Your Event ID
In the settings labeled ‘Server Event Data Override’, you’ll find an option for Event ID. Select that and enter your Event ID variable.
- Event ID – Event Data
Next, add the user data variables to match back events to users on Meta’s platform.
Adding User Event Data
User data includes everything from customer data to click IDs and browser level identification.
Add these parameters in the section labeled user data.
Variables like ‘value’ and ‘currency’ are submitted as custom data. Use event data variables to pull these into your tag.
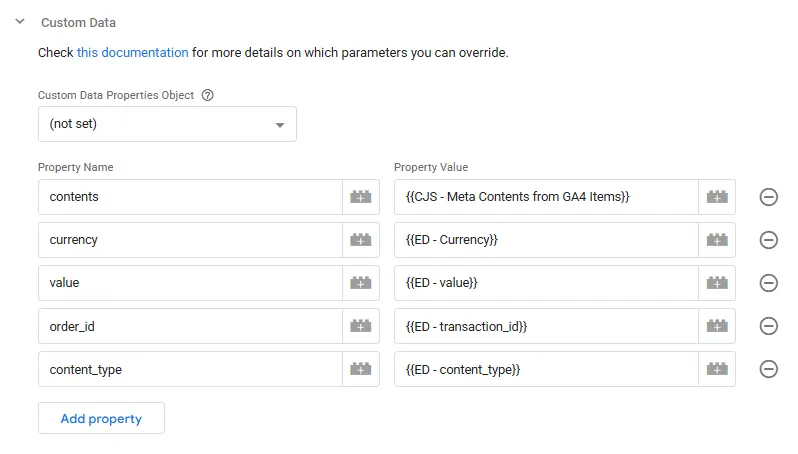
Adding Custom Event Data
In the section labeled custom data, set up variables for ecommerce parameters. See Meta’s official documentation for the parameters that can be included.
All of these parameters will use the event data variables created previously.
With all custom data added, the only step left is adding a trigger.
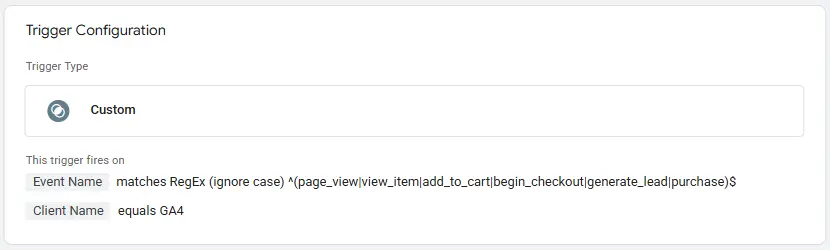
Setting Up A Trigger
To ensure the trigger fires only on events that Meta needs to receive, set up two firing conditions.
- Limit to GA4 intake
- Use only event names you want
The GA4 intake will fire on all GA4 events as long as they match the event names you specify. Event name matching uses regex to streamline setup.
With that, you’re all set. All that’s left is to test the integration to make sure it’s working properly.
Step 5: Test & Validate (sGTM Preview, Meta Test Events)
There are two steps involved in testing your CAPI setup – in sGTM and in Meta’s Events Manager.
Testing sGTM Preview Mode
Open up preview mode in your sGTM container and web GTM container, and load your site.
Ensure your analytics tags are firing in your web container preview, and you should start to see events populate in your sGTM preview.
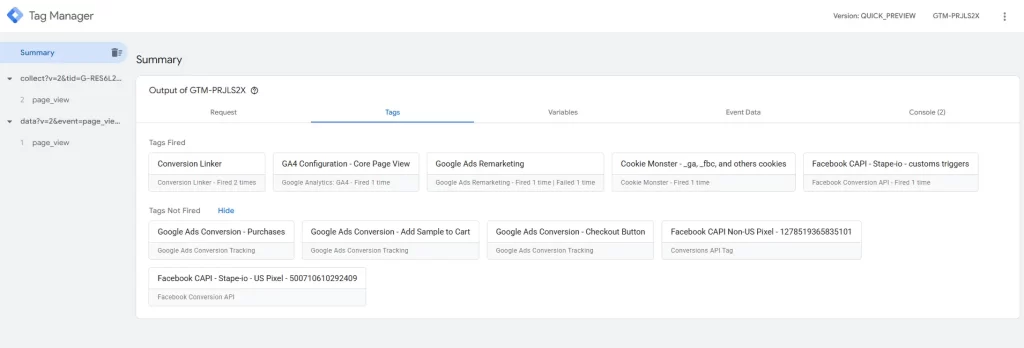
Ensure all event data is pulling through correctly in the ‘event data’ tab. Next, check to see if events are pulling through to Meta’s Events Manager
Testing Meta’s Events Manager
To use Meta’s test events feature, generate a code in the Events Manager and add it to the ‘test code’ section of your Facebook CAPI tag.
Generate a code in the section labeled ‘test server events’. Add this to your CAPI tag in your sGTM container.
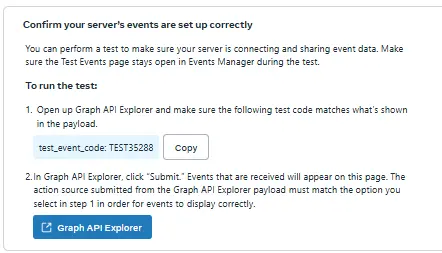
Once there, repeat the process with the sGTM preview mode – events will begin to show in your test events page in Events Manager.
If you don’t see anything, double check your Access Token and Facebook Pixel ID.
The 80/20 Server-Side Win
The GA4 → sGTM piggyback method transforms Meta’s Conversions API from a complex technical hurdle into an accessible solution that any business can implement for free. You’ve created a robust server-side tracking system that bypasses ad blockers while providing Meta’s algorithm with the high-quality conversion data it needs for optimization.
Monitor your Events Manager for match quality improvements over the next 2-3 weeks. Most businesses see enhanced attribution accuracy within this timeframe, leading to better campaign optimization and reduced costs per conversion.
For businesses ready to take their tracking infrastructure further, consider implementing persistent UTM tracking to complement your server-side setup, or explore multi-touch attribution models for comprehensive campaign measurement across all channels.