How To Track High Quality Sessions Using Facebook Custom Conversions
Standard Facebook ad objectives are failing to deliver quality traffic. As ad targeting becomes more and more automated, advertisers must adapt – using new methods to find high intent users. The solution? Custom conversions that track high-engagement sessions instead of simple page views.
Instead of optimizing for clicks that bounce immediately, what if you could target users who genuinely engage with your content? This guide shows you how to set up Facebook custom conversions that track multi-page sessions – resulting in higher engagement and, in certain cases, lower costs per conversion.
TL;DR
- Learn how to set up Facebook custom conversions to track high-quality sessions (2+ page visits) using Google Tag Manager.
- Read case studies showing 60% higher engagement time and 63% lower cost per action compared to standard link click campaigns.
- Get complete code setup and real performance data.
Prerequisites: Facebook Pixel and Google Tag Manager Setup
Before you begin, there are a few steps that need to be completed first. Check for the following:
- Google Tag Manager is set up on your site. See Google’s setup guide.
- Facebook Pixel is implemented on your site. See this helpful setup guide.
- General understanding of GTM tags, variables, triggers. AnalyticsMania has a good basics guide.
With this confirmed, you’re ready to begin.
Step 1: Creating a Page View Counter in Google Tag Manager
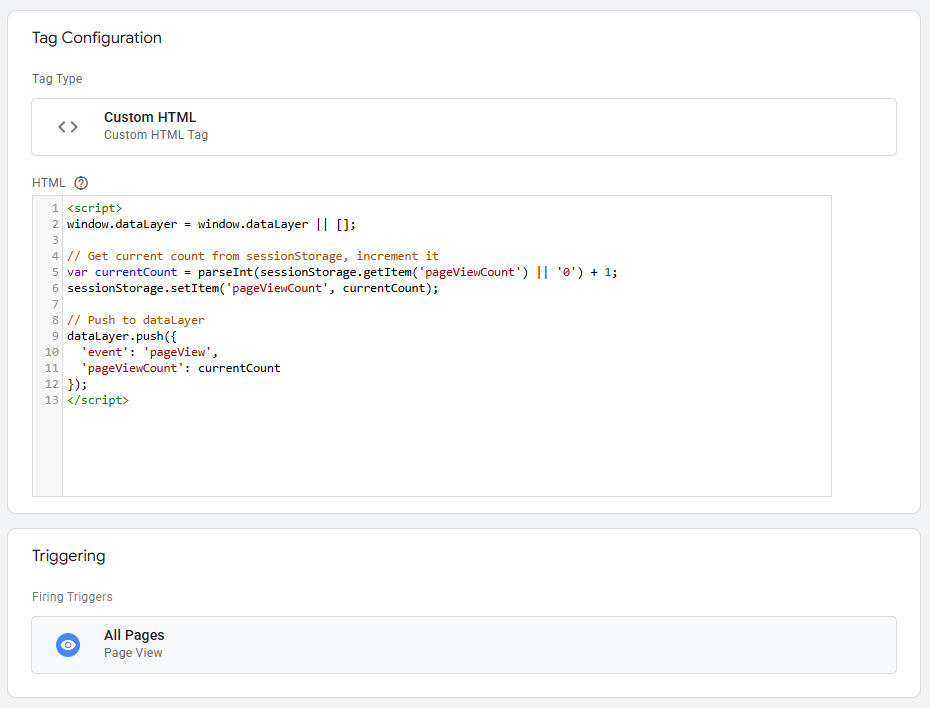
The page view counter is a necessary step to track how many pages each user views during their session. This set up involves a custom HTML tag that fires on all pages.
Detailed Script
<script>
window.dataLayer = window.dataLayer || [];

// Get current count from sessionStorage, increment it
var currentCount = parseInt(sessionStorage.getItem('pageViewCount') || '0') + 1;
sessionStorage.setItem('pageViewCount', currentCount);

// Push to dataLayer
dataLayer.push({
  'event': 'pageView',
  'pageViewCount': currentCount
});
</script>
Set the tag to fire on All Pages to ensure it counts each time a new page loads.
Your page view counter tag configuration should match this setup:
Next, setup the Data layer variable for page count.
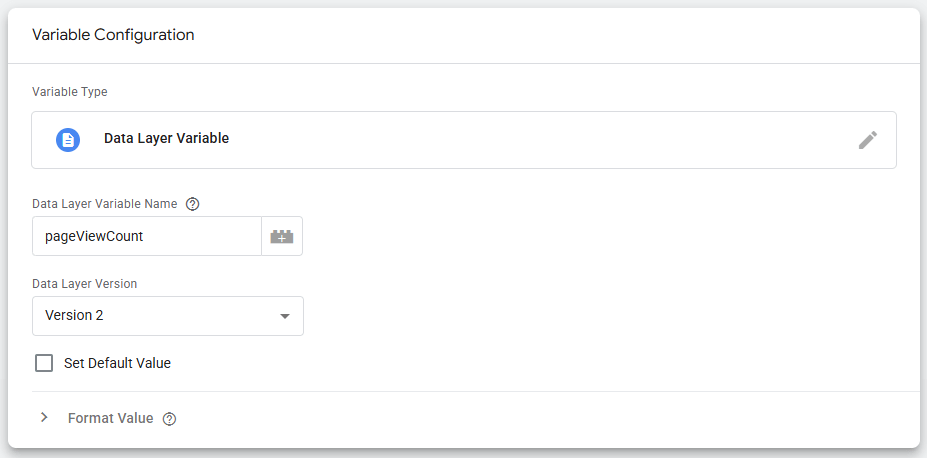
Step 2: Building a Data Layer Variable for Session Tracking
The data layer variable is what tracks the page count each time a new page loads, and enables the tag to track each successive page a user visits during their session.
Simply navigate to the variables tab in Google Tag Manager and build a new user-defined variable. When creating your new variable in GTM, navigate to Variables and select:

After selecting data layer variable, configure the name with the variable created from the page view counter: pageViewCount
The completed data layer variable configuration:
Now that the page count is tracked in the data layer, it’s possible to set up the Facebook tag to push events into Facebook ads manager.
Step 3: Setting Up Facebook Custom Conversion Events
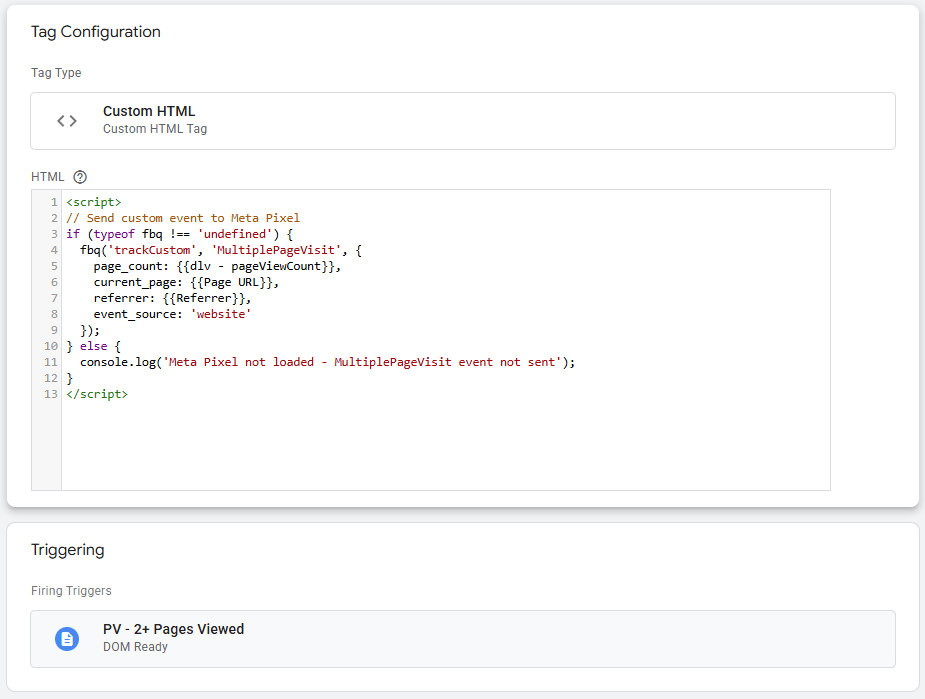
The Facebook tag can be set up simply as a pre-built Meta tag (simply selecting ‘custom’ as the conversion type), or as a custom HTML as shown below.
To configure the tag, certain variables will need to be included:
- Page Count: Set to the Data Layer Variable created previously
- Current Page: A dynamic page URL variable
- Referrer (optional): The last page visited by the user
- Event Source (optional): Website
These parameters will allow for more customization in the Facebook Ads manager.
Detailed Script
<script>
// Send custom event to Meta Pixel
if (typeof fbq !== 'undefined') {
  fbq('trackCustom', 'MultiplePageVisit', {
    page_count: {{dlv - pageViewCount}},
    current_page: {{Page URL}},
    referrer: {{Referrer}},
    event_source: 'website'
  });
} else {
  console.log('Meta Pixel not loaded - MultiplePageVisit event not sent');
}
</script>
Set the tag up to fire on all pages after initialization to ensure the variable tracks each successive page count. Once completed, the tag will look like this:
Be sure to preview the tag in Google Tag Manager to ensure it’s working properly. Once published, verify the event is being tracked in the Facebook events manager.
Step 4: Creating Custom Conversions in Facebook Ads Manager
Navigate to the Events Manager in the Facebook ads manager through the left hand navigation, and open up ‘Data Sources’. Once inside, scroll down to events.
There should be a new event named ‘MultiplePageVisit’. If not, the tag was not set up correctly.
After completing the setup, verify everything is working by checking your Events Manager dashboard:

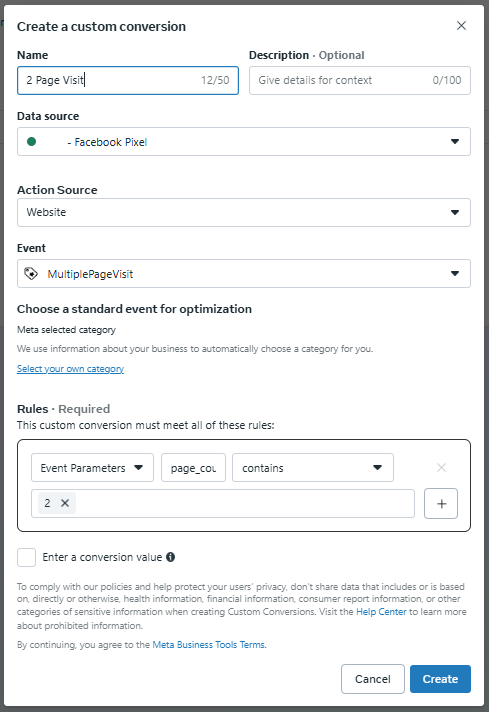
From here, you can create custom conversions to track pages visited. Navigate to ‘Custom Conversions’ and create a new custom conversion.
Here you can use the parameters set up within the tag to create different custom conversions. For instance, use the page_count variable to track user sessions that reach a set number of pages.
In this example, we’re creating a custom conversion that tracks all sessions that visit 2 pages or more. In Facebook Ads Manager, create your custom conversion with these exact settings:
Custom conversions can be tailored to your preference. If most users visit 2 pages on site, then set up a conversion that tracks 3 or 4 pages visited to narrow the audience and raise the bar for a conversion to occur.
The Page URL parameter can also be used to set up tags for certain pages, like a landing page or page sequence depending on the purpose of your site.
Once the custom conversion is set up, it’s time to apply to an ad campaign. Let’s take a look at two successful use cases.
Facebook Custom Conversions Case Studies: Real Performance Data
Both case studies look at instances where the multiple page visit custom conversion was used as the campaign objective. A/B tests were conducted to restrict audience overlap.
Case Study 1: 2+ Page Visits vs Link Clicks Campaign
This test was run for 2 weeks with a cumulative spend of roughly $1,000. The hypothesis was that the 2+ page visits objective would drive a higher CPC but also higher quality traffic.
Quality was measured in two parts:
- Engagement time on site
- Cost per action (measuring a button click on the landing page)
After conclusion, we observed the following results from the 2+ Page Visits campaign:
+90%
Average CPC
+60%
Average Engagement Time
-63%
Cost per Action
In conclusion, traffic volume was reduced due to a higher cost per click, but quality of traffic improved greatly.
Case Study 2: 5+ Page Visits vs Content View Optimization
Another test compared a higher page visit count against content view (product page view) objective to determine what difference in performance a higher page count threshold would produce.
We’ve reviewed the power of Content View optimization in How To Optimize Meta Ads: Why Conversions Beat Engagement.
However, as this was an e-commerce website, 5+ page sessions were not uncommon. The drawback: it severely restricted the audience size.
The hypothesis with this test was that because 5+ page sessions are highly correlated with qualified traffic, campaign targeting would be narrower and thus yield longer sessions and more conversion potential.
Measurement followed a similar framework to the test above. We predicted the following:
- Increase CPC (going after a smaller audience)
- Increase engagement time on site (higher quality)
After two weeks of A/B testing, the 5+ page visit campaign drove:
+30%
Average CPC
+18%
Average Engagement Time
+43%
Cost per Content View
While the campaign delivered higher engagement, it seemingly failed to drive more action on site given its higher cost per product page view. However, results are so far inconclusive as to which campaign will convert further down the line.
Takeaways From Facebook Custom Conversion Tests
From initial data, it would seem that 2 or 3 pages per sessions is the best threshold to reach a broad audience while still retaining some quality.
Ultimately, we saw the multiple page visit objective work better for lead gen websites vs e-commerce due to the wealth of product data included in e-commerce events.
Recommendation: For e-commerce run traffic to a blog or some other piece of educational content as a landing page and test multiple page visits as a starting point.
Ready to Implement Facebook Custom Conversions?
With the deprecation of targeting settings becoming an increasingly apparent reality on Meta Ads, advertisers need to devise new ways to reach high intent audiences through ad campaigns. The most reliable way to do so in today’s environment is through conversion optimization.
Setting up custom conversions like a multiple page visit event allows for more granular control over audience creation and an additional conversion objective to test against Meta’s standard events.
As you implement these quality-focused optimizations, consider how they fit into Meta’s broader algorithmic evolution – the Andromeda update is rewarding advertisers who embrace AI-driven campaign structures over traditional segmentation.
Following the guide outlined above, you can test the multiple page visit event in your Facebook ad campaigns. Just make sure to always test against existing tactics to get a better understanding of how your audience engages with your site, and what defines high intent.
For enhanced attribution and data quality, also consider implementing GCLID tracking for Google Ads and customer data hashing to build a comprehensive measurement stack across all platforms.