The Complete Guide to Google Analytics A/B Testing with Google Tag Manager
A/B testing has become essential for modern marketers, and Google Analytics offers powerful capabilities for implementing these tests. While there are many sophisticated testing platforms available, learning how to conduct A/B testing in Google Analytics can provide valuable insights without additional software costs.
Split testing (also known as A/B testing) lets you divide your audience into distinct groups to test different variations of marketing campaigns, website designs, or other features.
This guide explores how to leverage Google Tag Manager and Google Analytics 4 to create split audience tests that deliver valuable insights about user behavior. Whether you’re new to testing or looking to expand your analytics toolkit, you’ll learn a practical approach to A/B testing that doesn’t require expensive software.
But first, let’s review some GA4 audience basics.
Google Analytics Audiences: Background
While Google Analytics is often thought of as simply a reporting platform, it also has the capability to create audiences that can offer deeper analysis and ad targeting capabilities.
Audience definitions require two details:
- Events: To count users
- Parameters: To segment users
To create new audiences, navigate to the ‘admin’ section of GA4.
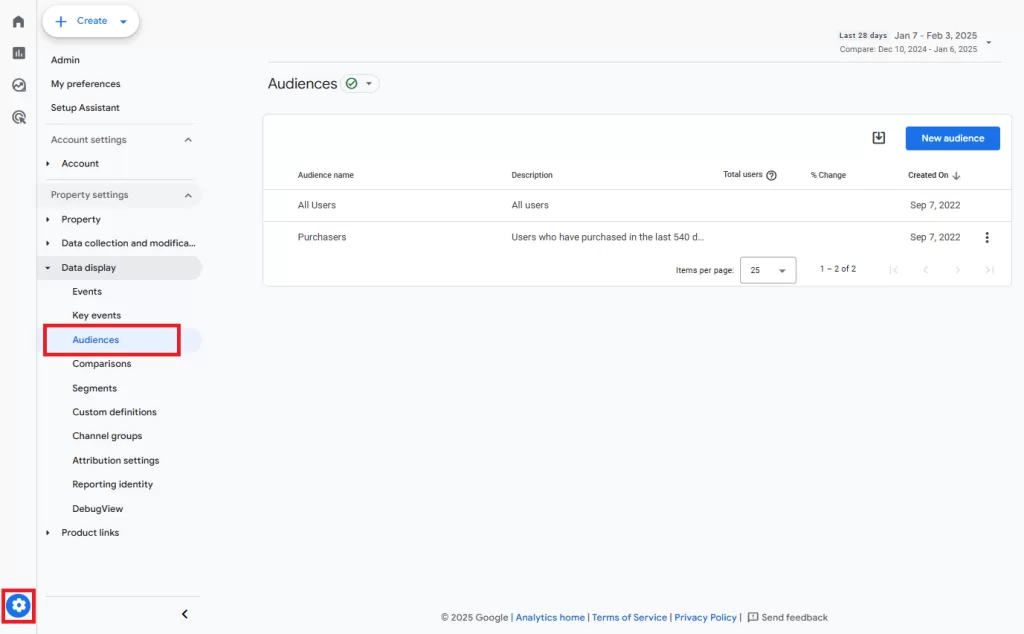
Here you can select ‘new audience’ and build it out using a combination of events and parameters.

Before this can be done, a custom event and parameters must be created for the split audience.
Google Analytics A/B Testing: GTM Implementation Guide
Setting up A/B testing in Google Analytics through Google Tag Manager requires careful configuration of cookies and variables. This implementation guide walks through the complete process to ensure accurate audience splitting and tracking.
Step 1: Create the Cookie Definition
A/B testing requires defining test and control groups through cookie implementation. We’ll use Custom JavaScript to add two essential variables to the data layer:
- userID: Unique identifier for each visitor
- testGroup: Assigns visitors to test or control group
Custom JavaScript Variable (CJS – video_test_create_cookies):
function() {
  function getCookie(name) {
    var value = "; " + document.cookie;
    var parts = value.split("; " + name + "=");
    if (parts.length === 2) return parts.pop().split(";").shift();
  }

  var userId = getCookie('video_test_user_id');
  var testGroup = getCookie('video_test_group');

  if (!testGroup) { // Corrected conditional: Check for testGroup cookie
    userId = 'user_' + Math.random().toString(36).substring(2, 15);
    testGroup = Math.random() < 0.5? 'test': 'holdout';

    document.cookie = "video_test_user_id=" + userId + ";max-age=15552000;path=/;SameSite=Lax"; // Added SameSite
    document.cookie = "video_test_group=" + testGroup + ";max-age=15552000;path=/;SameSite=Lax"; // Added SameSite
  }

  return {
    'user_id': userId,
    'test_group': testGroup
  };
}
Note: Adjust the probability split by modifying the 0.5 value. For example, 0.8 creates an 80/20 test/control split.
When completed, this will add a variable to the data layer that looks like this:

Step 2: Create Data Layer Variables
Set up two custom JavaScript variables to capture the cookie information:
- User ID Variable (CJS – video_test_user_id)
- Test Group Variable (CJS – video_test_group)
User ID: (CJS – video_test_user_id):
function() {
  return getCookie('video_test_user_id');
}
Test Group Variable (CJS – video_test_group):
function() {
  return getCookie('video_test_group');
}
Step 3: Create Cookie Assignment Tag
Implement a Custom HTML tag to split the cookie and assign values to your variables. This tag should fire on all pages:
Custom HTML Tag Configuration:
<script>
function getCookie(name) {
  var value = "; " + document.cookie;
  var parts = value.split("; " + name + "=");
  if (parts.length === 2) return parts.pop().split(";").shift();
}
</script>
Once complete, the data layer variables you created should capture information that looks like this:

Step 4: Create the Initialization
Set up a dummy script to trigger the initial Custom Javascript. This ensures the cookies are generated.
Custom JavaScript:
<script>
{{CJS - video_test_create_cookies}}
</script>
Trigger Settings:
- Tag Type: Custom HTML
- Fire On: All Pages
- Priority: 0 (ensures early execution)
- Tag Sequencing: None
Now that the cookies are created and being registered in the data layer, it’s possible to create a GA4 event.
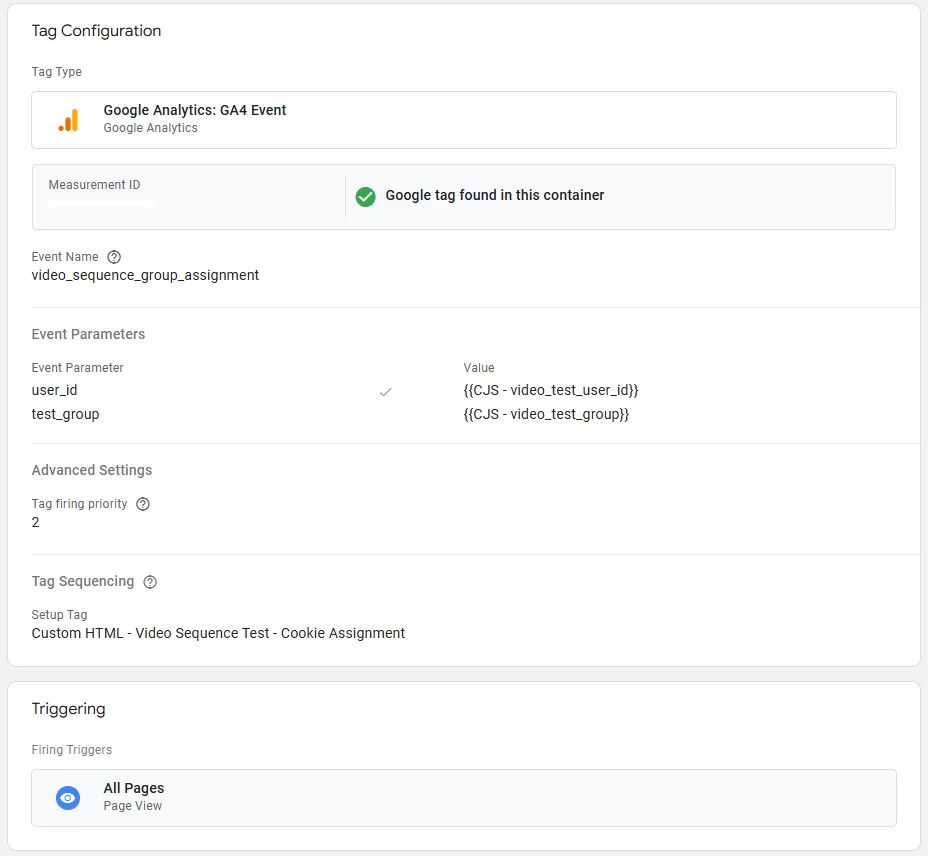
Step 5: Configure GA4 Event Tag
Create a GA4 event tag to capture test data. Event names and parameters can customized per test.
Event Configuration:
- Event Name: video_sequence_group_assignment
- Parameters:
- user_id: {{CJS – video_test_user_id}}
- test_group: {{CJS – video_test_group}}
- Trigger: All Pages
- Tag Sequencing: Fire after cookie assignment
Preview Mode Verification:
- Check data layer for correct variable population
- Verify cookie creation and values
- Confirm GA4 event firing
You should see a new event name in your GA4 dashboard. You can verify that it is populating in the ‘events’ tab of your GA4 dashboard.
How to Implement A/B Testing in Google Analytics
Google Analytics A/B testing can be implemented in two primary ways that help measure the impact of your marketing efforts:
- Testing Website Elements
- Measuring Ad Campaign Performance
A/B Testing Website Elements
Similar to dedicated A/B testing tools, Google Analytics lets you deliver different website experiences to distinct audience segments. This approach works particularly well for testing:
- Homepage headlines
- Call-to-action buttons
- Landing page layouts
- Form configurations
Implementation involves using a custom HTML tag where the testGroup variable determines which variation a user sees. Performance tracking in GA4 focuses on key metrics including:
- Engagement rate
- Average session duration
- Custom event completion (form fills, purchases)
- Conversion rate by variation
A/B Testing Ad Campaign Performance
Where Google Analytics A/B testing really shines is in measuring advertising incrementality – understanding the true impact of your campaigns on metrics that matter like leads and sales.
While this method requires using retargeting audiences (users must first interact with your site to be tagged by GA4), it offers unique insight into campaign effectiveness by comparing:
- Audiences exposed to ads
- Control groups that receive no advertising
Google Analytics Implementation Process:
- Create a custom audience for your test group in GA4
- Push the audience to Google Ads through the analytics integration
- Apply audience targeting to your campaign
- Monitor performance across both groups in Google Analytics
Key metrics to analyze include:
- Conversion rate (exposed & control)
- Website engagement metrics
- Path to purchase behavior
- Overall site performance
Benefits of A/B Testing in Google Analytics
This testing methodology offers several advantages:
Cost Efficiency
- Free implementation through GA4 and GTM
- No additional testing software required
Integration & Analysis
- Direct connection with Google Ads
- Measure performance of individual channels via UTMs
- Access to engagement & event level metrics
Audience Controls
- Hold-out testing
- Campaign overlap mitigation
- User experience testing
Drawbacks to Consider
That’s not to say everything is great about this approach – it does have some drawbacks including:
Technical Limitations
- Cookie-dependent tracking
- No support for multivariate testing
- Complex initial setup and QA process
Audience Restrictions
- Limited to retargeting audiences
- Potential for cross-device tracking issues
- Cookie clearing can affect results
Practical A/B Testing Applications
Let’s explore three real-world testing scenarios that showcase the power of Google Analytics A/B testing:
Video Campaign Optimization
With the shift of video action campaigns to demand gen campaigns in Q2 2025, the time to test demand gen video campaigns is now.
Compare traditional video campaigns against new demand gen formats:
- Measure watch time differences
- Track view-through rates
- Analyze conversion impact
- Control for seasonal factors
Read more about Demand Gen Campaigns and what to look for in 2025.
YouTube Sequencing Tests
Testing the impact of reach and frequency is becoming increasingly important as the value of awareness media becomes more apparent.
Evaluate the impact of video frequency on user behavior:
- Split audiences into exposure groups
- Measure organic conversion lift
- Track engagement metrics
- Analyze bounce rate impact
Display Retargeting Analysis
Display retargeting is great at keeping a brand top of mind, but does it drive incremental purchases?
Measure true incremental value of retargeting:
- Compare exposed vs control groups
- Track conversion rate differences
- Measure time-to-purchase impact
- Analyze brand search behavior
Start Testing with Google Analytics
Even as Google Analytics continues to evolve, A/B testing in Google Analytics remains a viable tactic. Our GTM implementation method offers a cost-effective alternative to expensive testing platforms, particularly excelling at measuring advertising incrementality and site experience optimization.
The power of this approach lies in its versatility – from video campaign testing to retargeting analysis, the process stays consistent: create audiences, measure behavior, analyze results. Start with a simple test using this guide, focus on statistical significance, and build on your learnings. In today’s fragmented digital world, understanding what drives results isn’t just valuable – it’s essential.
Ready to start testing? Begin with a simple A/B test using the implementation guide above, and don’t hesitate to iterate as you learn what works best for your specific needs.

