
Google Tag Manager + MCP: Automate Tag Creation with ChatGPT
Google Tag Manager has been the go-to tool for marketing tags since its inception. Now it gets a huge upgrade with Model Context Protocol (MCP)—a standard that lets tools integrate with AI models.
Old way: spreadsheet → manual GTM clicks → docs drift.
New way: the same spreadsheet → ChatGPT (via MCP) → GTM builds it for you.
This article shows practical use cases, a template, and how to deploy your MCP server on Google Cloud Run. Also, check out a bonus article on a Meta Ads MCP server for reporting and auditing.
TL;DR
- Build GTM tags in ChatGPT using a preformatted spreadsheet.
- Spreadsheet → ChatGPT (MCP) → GTM builds it for you.
- Your spreadsheet the documentation & implementation.
- Deploy once on Cloud Run; Run across any property from ChatGPT.
GTM MCP Use Cases
MCP doesn’t replace core GTM expertise but it does turn your expertise into repeatable workflows. Here’s how it helps right away.
Faster Container Audits
- Roll up by tag/trigger/variable
- Surface measurement gaps
- Track progress over time
Speed Up Tag Creation
- Batch from a spreadsheet (no UI clicking)
- Consistent naming automatically
- Fewer lookups/context switching
- Easy duplication of proven patterns
Create Better Documentation
- Implementation is documentation
- Reviewable change plans (dry-run first)
- Filterable sheet for fast reference
Bonus: staging dry-runs, multi-site rollout, onboarding
- Pre-production reviews: Dry-run plans in a staging container
- Multi-site rollout: Reuse trigger definitions, just swap hostname/path filters
- Onboarding & handoffs: One source of truth for new teammates
If you’re not convinced this is game-changing yet, let’s take a look at how it works (it’s easier than you think).
How MCP works with Google Tag Manager
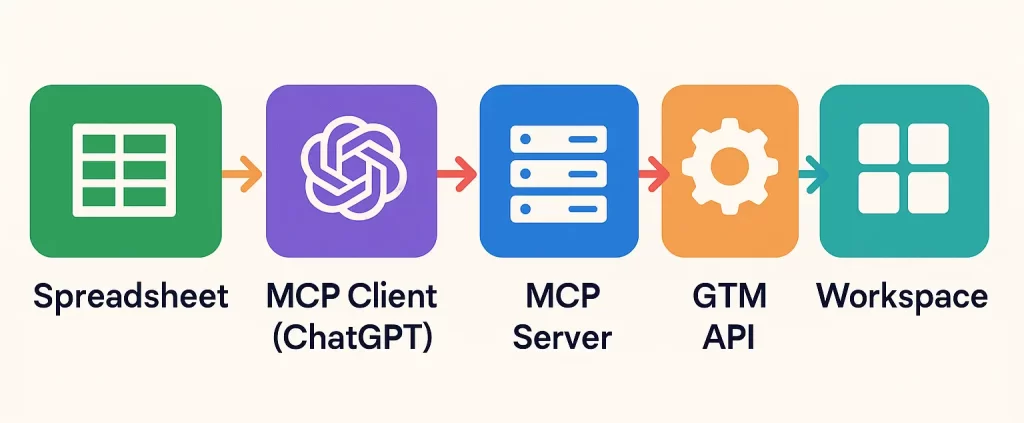
All that separates your AI model from GTM is two pieces: an MCP Server (your app) and the GTM API.
Key points
- MCP is the protocol; your server implements the tools.
- Starts read-only; you explicitly toggle writes.
- Dry-run shows the exact GTM objects before anything is created.
- Trigger filters & keys remove UI hunting and ID lookups.
- GA4 events can reference config by name or ID.
- Batch plan order: Triggers → GA4 Config → GA4 Events.
Template overview (screenshots + legend)
Craft a template to track each step of the implementation process starting with triggers.
Triggers tab (with filters)
Build triggers for each tag in a sheet that highlights their type, name, and specific details.

Variables (Filters)
Next, use variables to create specific logic within each trigger including page views, URLs, click URLs, etc.

Once these are built, start configuring the tag templates including the trigger IDs created previously.
Tag Tabs (for each platform)
Unique tag templates are needed for each platform, but the main focuses are Google Analytics, Google Ads, and Meta Ads.
Google Analytics
The two templates for Google Analytics are configuration (set up once) and events (set up for each event).
Events require more customization though with event parameters and varied triggers. Make sure to set up the measurement ID for both.

Ad Platforms
Create separate tabs for Google Ads and Meta Ads conversion pixels and include specifics like Pixel ID, Conversion ID, and Conversion Label.
Custom parameters are also available to send specific information like ecommerce purchase data.


Building out these templates is an easy task for any internal marketing/analytics team. However, there will also be a need to involved IT/development to set up the MCP server.
Setting Up MCP Workflows
The responsibilities of setting up and using MCP servers are split between marketing and IT.
Marketing/Analytics
- Fill the spreadsheet (Triggers → GA4 Config → GA4 Event).
- In ChatGPT, run a dry-run plan and review.
- When approved, apply and QA in GTM Preview.
IT/Development (One-time)
- Deploy the MCP server on Cloud Run.
- Add the service account email to GTM User Management (Read for audits; Edit to build).
- Share the Cloud Run URL, optional shared key, and GTM Account/Container/Workspace IDs.
For marketers with access to a server, we’ve reviewed how to set up a MCP server for Meta Ads. We’ll briefly recap the setup process.
Setup: Cloud Run + GTM API
The process can be completed in three steps focused on the primary pieces of data flow: MCP Client, MCP Server, GTM API.
Starting with the easiest, let’s see how to setup the GTM API.
Step 1: Set up GTM API
Start by enabling APIs & Services and connecting the necessary APIs.
Navigate to APIs & Services → Enable APIs & Services → Enable Tag Manager API, Cloud Run API, and Cloud Build API.
Create a service account (this will generate the service account email that you add to GTM client).
Navigate to IAM & Admin → Service Accounts → Create
Name your service something unique (i.e. gtm-mcp).
Step 2: Create the Cloud Run service
Create a new service in Cloud Run that will be used to host the MCP app.
Navigate to Cloud Run → Create Service
Select a deployment source that houses your app’s code.
- If using GitHub: Click Deploy one revision from source
- If using a text file: Choose Deploy one revision from existing container
Assign the necessary details to your service including:
- Service Name (i.e. gtm-mcp)
- Region: Pick the closest to your users
- Authentication: Allow unauthenticated
- Runtime Settings (Look in Containers, Variables & Secrets)
- Allow GTM Writes = 0 (only allows for read)
Click Create, and a new Server URL will be generated. Find it at the top of the page and keep it handy for the next steps.
Step 3: Grant GTM access (service account)
The app needs read/edit access in Google Tag Manager to conduct audits and add tags.
Navigate to GTM → Admin → Account → User Management → Add
Add your service account email and assign edit access for futureproofing.
Step 4: Connect the MCP client in ChatGPT
To use the tools in ChatGPT, create a custom connector. First enable the creation by turning on developer mode.
Navigate to Settings → Connectors → Advanced Settings → Developer Mode ON
Then create the server using your server URL (you can find it in your Cloud Run Service)
Navigate to Create → Add Name & Server URL → Create
This connector can now be assigned in the chat by clicking the ‘+’ icon and turning on ‘Developer Mode’.
Prompt Recipes (no code)
Your MCP server is only as useful as the prompts you give ChatGPT. Here are some starter ideas.
Audit Container
Get a read of what tags are built out in the container in a clean, organized list.
“Run
audit_containerfor Account<ID>, Container<ID>, Workspace<ID>. Summarize tag types, GA4 config presence, and issues.”
Plan Your Tag Setup
Understand what tags will be created and with what triggers prior to actually adding them to the container.
“Use
batch_plan_from_csvon the CSV I’m attaching. Tell me what will be created and in what order.”
Approve Your Tag Build
Push tag updates to the production container so they are ready to be published.
“Enable writes and run
batch_apply_from_csvon the same CSV, then list the new trigger/tag IDs.”
Test Trigger Builds
Unsure of the exact trigger setup? Dry run the setup to make sure all variables + settings are applied correctly.
“Use
create_trigger(dryRun=true) for an Element Visibility trigger named ‘EV – .hero-cta – 50%’ with CSS selector.hero-cta,minPercentVisible=50, filters: Page Hostname equalsexample.comAND Page Path starts_with/blog/.”
After prompting, be sure to check new tags in GTM Preview to make sure triggers and tags are firing properly.
Conclusion & Appendix
MCP turns GTM into a repeatable workflow: plan in a sheet, dry-run safely, then build in minutes. Your documentation stays in sync, and you keep full control (read-only by default). Start small—one trigger and one GA4 event—then scale across sites.
What to do next
- Download the template and fill one simple use case (1 trigger, 1 GA4 config, 1 event).
- In ChatGPT, run a dry-run plan and review the output.
- Apply, then QA in GTM Preview and GA4 Realtime.
- Scale: reuse triggers across sections/sites by swapping hostname/path filters.
Want more?
- Get a crash course MCP explainer for marketers.
- Explore the Meta Ads MCP to audit creative and reporting at the same cadence.
- Build your first Google Ads MCP server to streamline insights and reporting
Ready to try it? Grab the template and the repo, run a dry-run, and see how fast your first build ships.